
DIY Craft Wooden Pumpkins- Step-by-Step Guide
Craft Wooden Pumpkins: Your Guide to Durable, Beautiful Fall Decor
Crafting wooden pumpkins is a wonderfully satisfying DIY project that yields stunning, long-lasting decorations for your autumn displays. Unlike their perishable counterparts, these handcrafted pieces can be cherished for seasons to come, adding a warm, rustic charm to your home.
Moreover, this project is accessible to crafters of all skill levels, requiring only basic tools and a bit of creativity. This comprehensive guide will walk you through everything you need to know, from selecting the right wood to applying the perfect finish.
Why Choose Wooden Pumpkins for Your Fall Crafts?
Before diving into the how-to, it’s valuable to understand the why. Crafting pumpkins from wood offers several distinct advantages that make the effort worthwhile.
Firstly, wooden decor is incredibly durable. A real pumpkin lasts a few weeks before wilting, but a wooden one can become a family heirloom. Secondly, you gain complete creative control. You can dictate the size, shape, color, and texture, ensuring each piece perfectly matches your home’s aesthetic.
Additionally, this project is an excellent way to use scrap wood, making it both economical and sustainable. Consequently, you end up with a personalized decoration that is both eco-friendly and built to last.
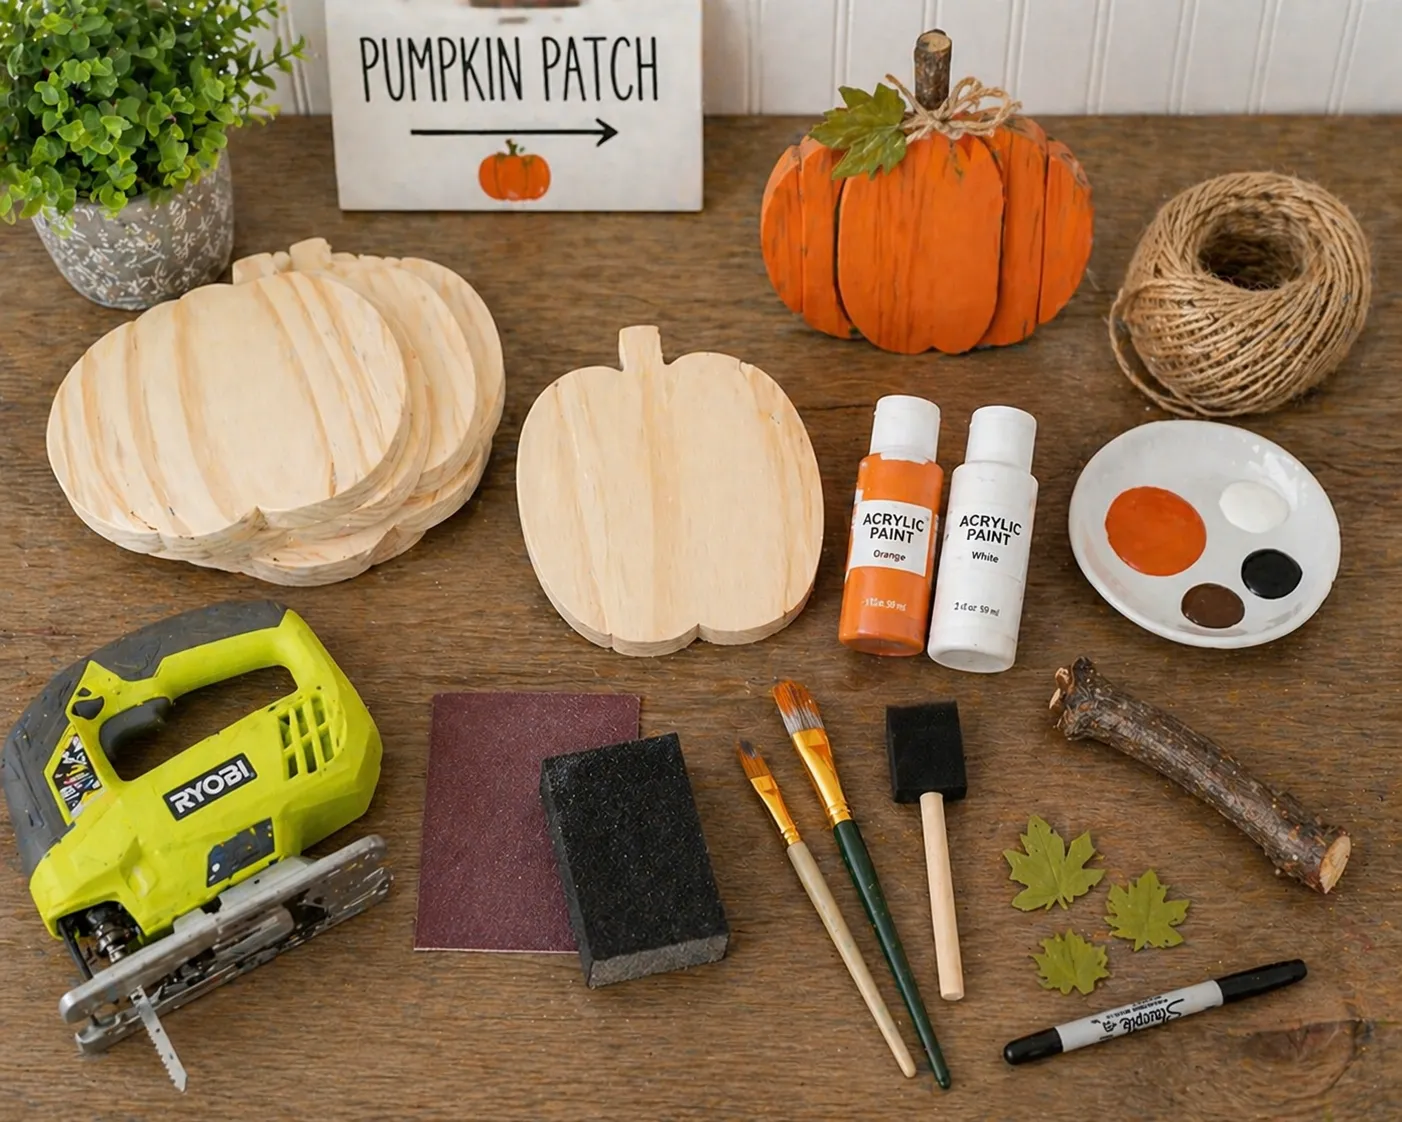
Essential Materials and Tools for Your Project
Gathering your supplies beforehand makes the crafting process smooth and enjoyable. Here is a breakdown of what you’ll need.
Basic Materials List
- Wood: Pine, cedar, or poplar are excellent, easy-to-work-with choices. You can use new boards, fence pickets, or reclaimed wood.
- Saw: A jigsaw or bandsaw is ideal for cutting curved pumpkin shapes.
- Sandpaper: Various grits (80, 120, 220) for smoothing rough edges.
- Wood Glue: For assembling segments if making a 3D pumpkin.
- Clamps: To hold glued pieces securely while drying.
- Primer & Paint: Acrylic craft paint or chalk paint works beautifully.
- Brushes: A variety of sizes for base coats and detail work.
- Sealer: A clear matte or satin polyurethane to protect your finished work.
Optional Embellishments
- Wood stain for a natural look
- Twine or a small branch for the stem
- Moss or glitter for added texture
- Wood burning tool for detailed designs
Step-by-Step Guide to Crafting Your Wooden Pumpkin
Follow these clear steps to transform a simple piece of wood into a charming autumn centerpiece.
Step 1: Design and Cut Your Pumpkin Shape
Begin by sketching your pumpkin shape onto the wood. You can draw a simple oval or a more traditional pumpkin silhouette with segments. For a classic look, consider making several wooden slices to glue together into a rounded form, similar to the techniques some crafters use in FFXIV macro crafting, where precise, repeatable steps are key to a perfect result. Use your saw to carefully cut out the shape. If making a 3D pumpkin, cut multiple identical slices.
Step 2: Sand and Prepare the Wood
This is a crucial step for a professional finish. Start with coarse-grit sandpaper to remove any splinters or major saw marks, then progress to finer grits until the surface is perfectly smooth. Pay special attention to the edges to create a soft, worn look. Thorough sanding also helps paint adhere better later on.
Step 3: Assemble and Add the Stem
If you are creating a multi-slice pumpkin, arrange the pieces in a stack, applying wood glue between each layer. Clamp them together firmly and allow to dry completely according to the glue’s instructions. For the stem, you can glue a small piece of dowel, a trimmed branch, or even a roll of cinnamon sticks to the top. For a truly natural touch, you might draw inspiration from the pure ingredients discussed in our guide to what is raw and unfiltered honey, seeking out untreated, rustic materials.
Step 4: Paint and Decorate
Now for the most creative phase! Apply a primer if desired, then your base coat of orange, white, or any color you fancy. Use darker shades to define ridges and lighter shades for highlights. You can create anything from a realistic pumpkin to a whimsical, patterned design. Don’t forget the stem—painting it a deep brown or green adds realism.
Step 5: Seal and Protect
Once the paint is fully dry, apply 1-2 thin coats of a clear sealer. This protective layer guards against moisture and UV damage, ensuring your craft wooden pumpkin looks vibrant for years. Allow the sealer to dry completely before displaying your masterpiece.
Creative Painting and Design Ideas
To make your pumpkins truly unique, move beyond basic orange. Here are some popular themes:
| Design Theme | Color Palette | Key Techniques | Best For |
|---|---|---|---|
| Farmhouse Chic | Creamy whites, soft grays, muted sage | Dry brushing, distressed edges | Mantels, dining tables |
| Modern Geometric | Black, gold, navy, blush pink | Sharp lines, metallic accents | Contemporary interiors |
| Rustic Natural | Unpainted stained wood, clear sealant | Wood burning, natural stem | Porches, garden decor |
| Whimsical & Fun | Rainbow colors, polka dots, stripes | Stenciling, detailed brushwork | Children’s rooms, playrooms |
Frequently Asked Questions (FAQs) – Craft Wooden Pumpkins
1. What are craft wooden pumpkins?
Craft wooden pumpkins are decorative pumpkin-shaped items made from wood for DIY projects, fall décor, and seasonal crafts.
2. What are wooden pumpkins used for?
They are used for Halloween decorations, Thanksgiving displays, porch décor, centerpieces, and handmade gifts.
3. Can I paint craft wooden pumpkins?
Yes, wooden pumpkins are perfect for painting with acrylic paint, chalk paint, stains, or markers.
4. Are wooden pumpkins reusable?
Yes, unlike real pumpkins, wooden pumpkins can be stored and reused every year.
5. What sizes do craft wooden pumpkins come in?
They come in small tabletop sizes, medium shelf décor sizes, and large porch display sizes.
6. Can kids decorate wooden pumpkins?
Yes, kids can paint and decorate wooden pumpkins with supervision.
7. How do I decorate a wooden pumpkin?
You can use paint, ribbon, twine, glitter, stencils, fabric, beads, or farmhouse-style finishes.
8. Are wooden pumpkins good for outdoor décor?
Yes, sealed or weather-protected wooden pumpkins can be used outdoors.
9. Can I make DIY wooden pumpkins at home?
Yes, many people make them using scrap wood, wood blocks, pallets, or cut wood shapes.
10. What paint works best on wooden pumpkins?
Acrylic paint and chalk paint are popular choices for easy coverage and decoration.
11. Can wooden pumpkins be used for weddings or events?
Yes, they are popular for autumn weddings, harvest parties, and rustic seasonal events.
12. Are craft wooden pumpkins eco-friendly?
They can be eco-friendly when made from reclaimed or responsibly sourced wood.
13. Can I sell handmade wooden pumpkins?
Yes, handmade wooden pumpkins are popular seasonal products at craft fairs and online stores.
14. Why are wooden pumpkins better than real pumpkins?
They last longer, do not rot, need less maintenance, and can be reused yearly.
15. Why are craft wooden pumpkins so popular?
They combine rustic charm, seasonal beauty, durability, and creative decorating options.
Displaying and Caring for Your Wooden Pumpkins
Your crafted pumpkins are versatile. Cluster them on a porch step, line them along a mantel, or use them as a table centerpiece interspersed with autumn leaves and candles. To care for them, simply dust regularly with a soft cloth. If used outdoors, bring them inside during severe weather to prolong their life. With minimal care, these decorations will become a beloved part of your seasonal traditions.
Crafting wooden pumpkins is more than just a DIY project; it’s a way to create lasting memories and decor with your own hands. By following this guide, you’re equipped to produce beautiful, durable pieces that celebrate the cozy spirit of fall. Therefore, gather your materials, embrace the process, and enjoy the timeless beauty of your handmade autumn harvest.